Yes, you can put many bird feeders in the dishwasher, but not all of them. Hard plastic, glass, and stainless steel components from feeders that are specifically labeled dishwasher-safe can go in safely. Wood, painted finishes, soft rubber seals, and certain thin or old plastics should stay out. When a feeder is dishwasher-safe, the hot-water cycle does a genuinely good job removing organic soil and reducing bacteria, especially if your machine has a sanitize setting. When it is not, or when you have doubt, a thorough hand-wash followed by a 10-minute soak in a 1:9 bleach-to-water solution does the same job without the risk of warping or cracking a feeder you spent real money on.
Can You Put Bird Feeders in the Dishwasher? A Safe Guide

Eleanor Hartwick
19 Jul 2026
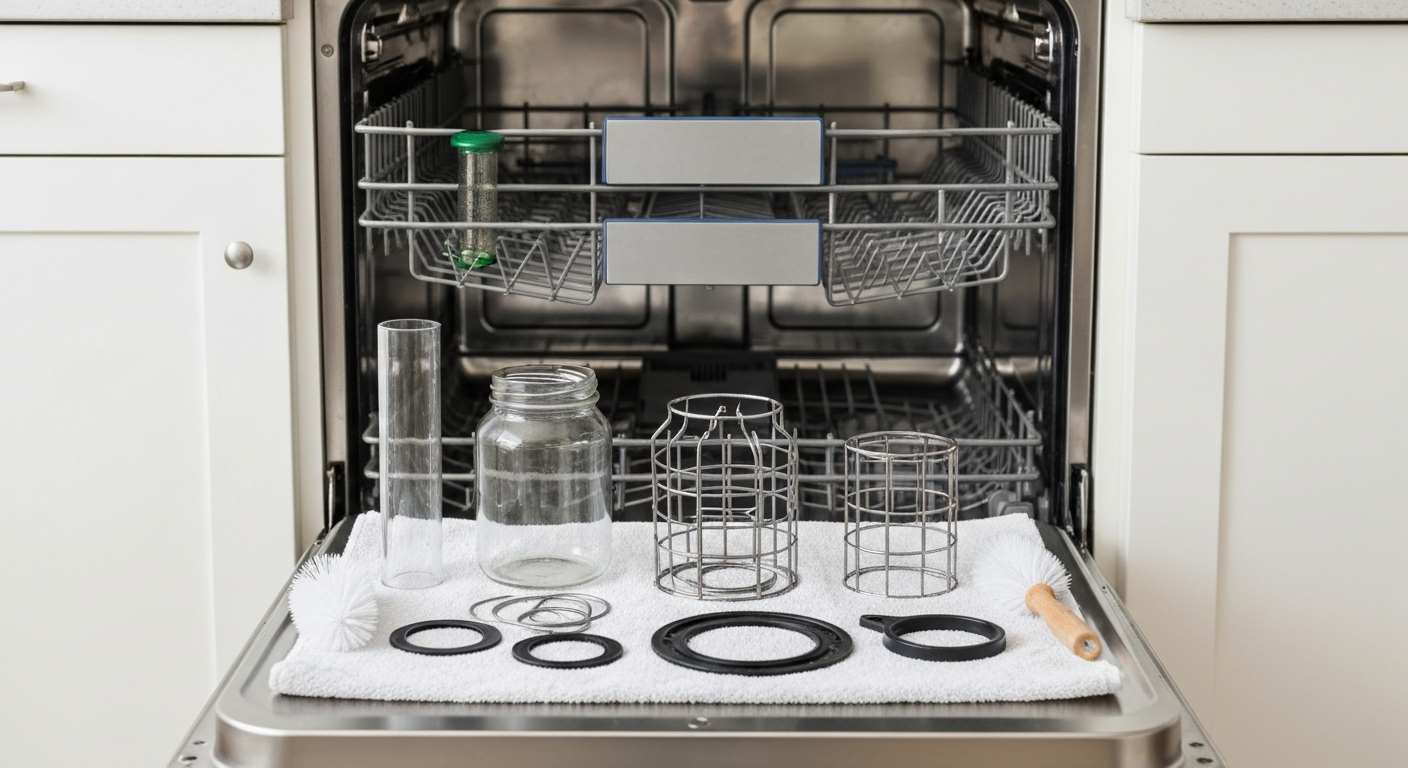
Dishwasher or hand-wash: a quick decision flow
Before you load anything into your dishwasher, run through these four questions. They take about 30 seconds and will save you from melting a port tube or cracking a glass reservoir you cannot easily replace.
- Is the feeder or its individual parts labeled 'dishwasher-safe' by the manufacturer? If yes, proceed. If no or unknown, hand-wash.
- Is the feeder made entirely of hard plastic, glass, ceramic, or stainless steel with no wood, painted coatings, or glued joints? If yes to all, the dishwasher is likely fine. If any part is wood, painted, or glued, remove those parts or hand-wash the whole unit.
- Are all rubber or silicone gaskets and O-rings in good shape, not cracked or brittle? Dishwasher heat accelerates degradation of aging seals. If seals look worn, hand-wash and replace the seals before the next cycle.
- Have you removed all seed, suet, nectar residue, and debris? Solid food residue can clog your dishwasher filter and also shields pathogens from heat and detergent. Always pre-rinse before loading.
If you pass all four checks, the dishwasher is a legitimate, time-saving cleaning method backed by Cornell Lab's Project FeederWatch, which states plainly that 'cleaning bird feeders in a dishwasher works very well.' If you fail any check, the sanitizing alternatives section below gives you equally effective options.
Do and don't checklist for the dishwasher
- DO check the manufacturer's label or manual before putting any feeder in the dishwasher
- DO fully disassemble the feeder before loading — ports, perches, trays, caps, and base plates all need to come apart
- DO pre-rinse or pre-soak to remove bulk food debris before the cycle starts
- DO place parts on the top rack unless the manufacturer's instructions specifically say bottom rack is acceptable
- DO use the hottest cycle your machine offers, ideally a 'sanitize' setting that hits at least 150°F (66°C) on the final rinse
- DO allow parts to air-dry completely before reassembly — never refill a damp feeder
- DO inspect every part for cracks, warping, or seal damage after the cycle before reassembling
- DON'T put wood, bamboo, or natural-fiber components in the dishwasher
- DON'T put feeders with painted, lacquered, or powder-coated finishes in the dishwasher unless the manufacturer explicitly says it is safe
- DON'T put thin or flexible plastics (soft squirrel-baffle skirts, pliable port plugs) in the dishwasher — they warp or melt
- DON'T put feeders with glued joints or ornamental ceramic accents in the dishwasher
- DON'T run the dishwasher with dish soap meant for hand-washing — the foam can damage the machine; use only automatic dishwasher detergent
- DON'T skip post-cycle inspection — a seemingly clean feeder with a cracked port or a degraded seal is a disease risk
- DON'T assume one dishwasher cycle eliminates biofilm; if a feeder has visible slime or heavy buildup, scrub first with a brush, then wash
Which materials are generally dishwasher-safe
Material type is the single most reliable predictor of whether a feeder or component will survive repeated dishwasher cycles. Here is what I have found holds up consistently.
| Material | Dishwasher-safe? | Notes |
|---|---|---|
| Hard, rigid polycarbonate or ABS plastic (labeled dishwasher-safe) | Yes, top rack | The most common feeder tube and hopper material; holds up well on the top rack |
| Borosilicate glass (nectar jar, seed tube) | Yes, top rack | Durable, heat-stable; check that any metal collar or ring is also safe before loading |
| Stainless steel (mesh, wire, hardware) | Yes, generally | Rust-resistant alloys handle dishwasher chemistry well; check for non-stainless galvanized parts |
| Food-grade silicone gaskets and seals | Usually yes | Silicone is heat-stable; replace aging or cracked seals regardless |
| Ceramic or glazed porcelain feeder dishes | Usually yes | Confirm glaze is lead-free and food-safe; unglazed areas absorb water and can crack |
| Acrylic (clear plastic) | Caution — check label | Some acrylics craze or cloud over repeated cycles; top rack only, low-heat dry preferred |
| Powder-coated metal parts | No (generally) | Coating can chip and corrode with repeated dishwasher exposure |
| Wood, bamboo, cork | No | Swells, cracks, and warps — always hand-wash |
| Painted or lacquered finishes | No | Paint strips and can contaminate food surfaces |
| Thin soft plastic (flexible plugs, baffles) | No | Deforms under heat; hand-wash only |
| Galvanized steel or zinc-coated wire | No | Alkaline detergent accelerates corrosion; hand-wash and dry promptly |
| Rubber O-rings and gaskets | Caution | Natural rubber degrades faster in dishwashers than silicone; replace annually regardless |
Materials and finishes to keep out of the dishwasher
Wood is the biggest offender. Even a quick dishwasher cycle soaks wood thoroughly, causing it to swell on the way in and crack when it dries. I have seen decorative hopper roofs split cleanly in half after a single wash. If your feeder has any wood parts, remove them and wipe them down by hand with a damp cloth, then let them dry fully in open air.
Painted and powder-coated finishes are the second major problem. Dishwasher detergent is strongly alkaline, typically built around sodium carbonate and oxygen-bleach chemistry. That alkalinity is great for dissolving bird droppings and seed oil, but it strips decorative coatings. Once paint or powder coat starts chipping, those chips end up near your feeder's food surfaces, and the exposed metal underneath begins to corrode. If a feeder's structural metal is protected only by a decorative finish rather than being inherently rust-resistant stainless steel, keep it out of the machine.
Soft or flexible plastics are the third category to watch. Perky-Pet and similar brands use rigid polycarbonate for their main tubes, but they often include softer plastic components for plugs, seed ports, and decorative elements. These deform at dishwasher temperatures. If you cannot clearly identify a plastic component as hard and rigid, default to hand-washing it.
How to prepare and disassemble a feeder before loading
Proper disassembly is not optional. A closed-up feeder in a dishwasher is basically a sealed container of dirty water; the wash water cannot reach interior surfaces, the cycle cannot clean seed ports or baffles, and pathogens stay protected. Here is the process I use before every machine wash.
- Empty all remaining seed, nectar, suet, or other food completely — dump it in a compost bin or away from the feeder area to avoid attracting rodents
- Disassemble every removable part: top cap, base plate, perch bar, individual seed ports, inner baffles, trays, and any hanging wire or hook that threads through plastic
- Remove all rubber or silicone gaskets and O-rings and inspect them before washing — cracked or brittle seals should be replaced, not washed and reused
- Rinse each part under running tap water to knock off bulk seed debris, shells, mealworm casing, or suet chunks; a quick 5-minute soak in warm water softens caked-on residue
- Use a stiff brush or bottle brush to scrub ports, feeding holes, and any narrow passages — the dishwasher will not reliably reach into tight spaces
- If food residue includes oily material (peanut butter, coconut oil, suet), soak parts in warm water with a few drops of dish soap for 10–15 minutes before loading to break the oil film
- Place all small components in a mesh bag or secure them in the utensil basket so they do not migrate to the drain or trap area during the cycle
Best dishwasher settings, rack position, and detergent
Top rack, hottest cycle, no heated-dry. That is the short version. Here is the reasoning behind each choice.
The top rack runs cooler than the heating element at the bottom of the machine, which protects plastic parts from deforming. Almost every manufacturer who endorses dishwasher cleaning specifies top rack, including Perky-Pet in their model-specific manuals. Large items like hopper bodies and tray bases can go on the bottom if they are confirmed dishwasher-safe metal or thick ceramic, but when in doubt, top rack.
Cycle choice matters more than most people realize for sanitation. Residential dishwashers certified to NSF/ANSI Standard 184 must deliver a final rinse temperature of at least 150°F (66°C) during their sanitize cycle and demonstrate a 5-log bacterial reduction. If your machine has a sanitize or sani-rinse setting, use it for feeders. If it does not, the hottest standard cycle still provides meaningful bacterial kill, but consider following up with a bleach soak (see the sanitizing alternatives section) if you are cleaning feeders during a disease outbreak or after a sick bird visit.
For detergent, use a standard automatic dishwasher detergent, either tablet, powder, or gel. Phosphate-free formulas common since the mid-2010s still work well for feeder cleaning. Avoid using hand-dish soap in a dishwasher: it creates excessive foam, can damage the pump, and leaves a surfactant residue. Skip rinse-aid for feeder parts since any residue left on food-contact surfaces is a concern; parts air-dry fine without it.
Heated dry cycles push hot air over parts at temperatures that can warp lighter plastics. Use air-dry or the lowest-heat drying option and remove parts promptly once the cycle ends. Lay them on a clean towel in a well-ventilated spot and let them fully air-dry for at least a few hours before reassembly. A feeder reassembled while damp will grow mold faster than one that was never cleaned.
Real risks of dishwasher cleaning that are worth knowing
The dishwasher is a good tool, but it is not risk-free. Here are the failure modes I see come up repeatedly.
- Warping and cracking: Repeated thermal cycling weakens polycarbonate and acrylic over time. A feeder tube that has been through 50 dishwasher cycles may develop hairline cracks that trap bacteria and are impossible to clean
- Coating damage: Alkaline detergent strips painted, lacquered, and some powder-coated finishes after just a few cycles, exposing bare metal to corrosion
- Rust on unsuitable metals: Galvanized steel and some zinc-coated wire corrode rapidly in dishwasher conditions; rust on food-contact surfaces is both a feeder hygiene problem and a structural one
- Seal and gasket failure: Rubber degrades faster than silicone under dishwasher heat. A failed seal on a nectar feeder causes leaks; a failed seal on a seed tube feeder lets moisture in, leading to seed mold
- Biofilm survival: Research on Salmonella biofilms shows that organisms embedded in a biofilm matrix resist disinfectants and can survive even high-temperature washing. Dishwasher cycles help but do not guarantee pathogen removal when a feeder has visible slime or heavy buildup. Mechanical scrubbing before the cycle is not optional — it is the step that breaks up the biofilm so heat and detergent can do their job
- Disease cross-contamination: You are washing a feeder that has been visited by wild birds in your household dishwasher. A 2026 study confirmed that feeder surfaces can act as fomites for Mycoplasma gallisepticum. Run feeder loads separately from household dishes, or at minimum run a short empty cycle after to clean the machine
- Incomplete cleaning of narrow ports: Tube feeder seed ports and small drinking ports on hummingbird feeders need a brush, not just hot water. The dishwasher does not project water into these spaces reliably
Step-by-step: cleaning by feeder type
Tube feeders and seed dispensers
Tube feeders are the most common feeder type and, when made from hard polycarbonate, among the most dishwasher-friendly. Manufacturers like Perky-Pet explicitly approve top-rack placement for certain models; Droll Yankees, by contrast, recommends hand-washing their tube feeders. Check your specific model first.
- Remove top cap, bottom cap or tray, and all perch bars — most twist or pull off; consult your manual if they seem stuck
- Slide out any inner divider baffles if present
- Remove seed ports and port plugs; brush the port openings with a narrow bottle brush before loading
- Remove any gaskets and inspect them
- Pre-rinse all parts under warm running water to flush seed hulls and debris
- Load the tube vertically or at an angle in the top rack with both ends open so water can flow through
- Run on hottest available cycle (sanitize if available)
- Air-dry completely, reassemble, and inspect ports and the tube interior with a flashlight before refilling
Hopper and gravity feeders
Hopper feeders present the biggest material variety challenge because they combine plastic or metal hoppers with wood or composite roofs, perches, and bases. In my experience, most hopper feeders sold at mass-market retailers are not fully dishwasher-safe because of their wood or painted components.
- Remove the roof assembly — if it is wood, set it aside for hand-wiping only
- Remove all wood perches, wood side panels, and any decorative painted pieces
- Detach the plastic or metal seed hopper chamber and seed tray
- Remove any closing gates or seed-flow adjusters
- Pre-rinse all dishwasher-safe parts to remove seed and shell debris
- Load plastic hopper and tray on top rack; load any stainless hardware in the utensil basket
- Wipe wood parts with a damp cloth, rinse, and allow to dry fully in open air
- Reassemble only when every component is completely dry
Tray and platform feeders
Open tray feeders accumulate the most droppings directly on food surfaces and are among the highest disease-risk designs, as the RSPB notes. They are also among the simplest to clean: if the tray is a single dishwasher-safe plastic or metal piece, it loads directly.
- Empty and rinse the tray to remove all seed, shells, and visible droppings before loading
- If the tray has drainage holes, check that they are clear and not blocked by caked debris
- Load tray flat on the bottom rack (for metal or confirmed heat-safe materials) or top rack (for plastic)
- Any screen mesh insert can usually go in the utensil basket or be secured in a mesh laundry bag
- Follow with a full sanitize cycle
- Air-dry fully — tray feeders must be completely dry before refilling as standing moisture causes rapid mold on seed
Suet cages and metal-wire feeders
Steel-wire suet cages are simple and generally dishwasher-safe if they are made from stainless or vinyl-coated steel, not galvanized wire. Suet leaves a persistent greasy film that the dishwasher handles well with its alkaline detergent chemistry.
- Remove any remaining suet cake completely — do not try to wash a full cake down the drain
- Pre-soak the cage in warm water for 10–15 minutes to loosen the grease film
- Scrub with a stiff brush before loading; grease biofilm will survive the dishwasher if you skip this step
- Check whether wire is stainless or galvanized: galvanized wire corrodes in dishwasher conditions, so hand-wash those
- Load stainless cages flat or upright in the bottom rack, or fold-open cage into utensil basket
- Run on hottest cycle
- Inspect welds and hinge points for rust after each wash and retire any cage showing significant corrosion
Nectar and hummingbird feeders
Many hummingbird feeders are sold with 'dishwasher-safe' labels, typically for the glass jar and the hard plastic base assembly. However, the small feeding ports, narrow nectar channels, and any rubber stoppers need brush cleaning regardless of whether the main parts go in the dishwasher, because the machine does not reliably project water through narrow tubes.
- Empty and rinse nectar thoroughly — stale nectar grows mold and yeast rapidly and needs to be removed before washing
- Disassemble the feeder completely: glass jar, plastic or metal base, individual feeding ports, stoppers, and any ant moat
- Hand-scrub each feeding port with a small bottle brush or pipe cleaner
- Confirm whether the base and glass jar are labeled dishwasher-safe; if so, load both on the top rack
- Do not put rubber stoppers in the dishwasher — hand-wash and air-dry
- Run top rack on hottest cycle
- Air-dry all parts before reassembly — any moisture left in the nectar channels creates a mold environment within hours in warm weather
In warm weather (above 70°F), hummingbird feeders should be cleaned every 2–3 days because nectar ferments that quickly. The dishwasher makes this easier to keep up with, which is one of its genuine practical advantages.
Pinecone, peanut-butter, and specialty sticky feeders
Natural pinecone feeders coated with peanut butter or suet are not dishwasher candidates at all: the pinecone itself disintegrates in water, and any natural binder material needs hand-washing. If the 'feeder' is a reusable plastic or ceramic cylinder or log designed to be stuffed with peanut butter or suet blend, treat it like a suet cage: pre-soak to break the grease, brush the cavities thoroughly, then dishwasher-safe materials can go in the top rack if labeled as such.
Residue-specific tips: seeds, mealworms, peanuts, and shells
Different food residues need slightly different pre-treatment before the dishwasher or any wash method. Oats and shelled seeds become a paste when wet and can block dishwasher filters if not rinsed first. Give those parts a thorough cold-water rinse before loading. Dried mealworm casings are lightweight and tend to float around inside the dishwasher; bag them in a mesh laundry bag or rinse them out completely beforehand. If you wonder whether you can put dried mealworms in a bird feeder, you can, just keep them dry or bag them (for example in a mesh bag) so they don't clump, float, or attract mold can you put dried mealworms in a bird feeder. Peanut shells and sunflower hulls are the most common clog culprits, shake them out, then rinse. If you wonder 'can you put peanuts in a bird feeder', remember that whole peanuts and shells can clog feeders or attract pests, so shake out shells and consider offering shelled peanuts or peanut-based suet instead.
For oily or sticky residues like peanut butter, coconut oil, or suet, the dishwasher's alkaline detergent does break down fat effectively, but only if the bulk residue is removed first. For guidance on using coconut oil and its effects on feeders and birds, see can you use coconut oil for bird feeders. Pre-soak parts in warm water for 10–15 minutes, then add a small drop of hand-dish soap to the soak water (not in the dishwasher itself) and agitate briefly. Rinse before loading. Enzyme-based pre-soak products (the same type used for heavily soiled kitchen items) also work well on suet and fat residue. If you use peanut butter or coconut oil as part of your feeding setup, you may want to do a monthly deep soak before the dishwasher cycle to prevent fat buildup in feeder joints and channels.
When the dishwasher is not enough: safe sanitizing alternatives
The dishwasher cleans well, but it does not guarantee full pathogen elimination on a feeder that has visible biofilm, heavy organic buildup, or has been visited by visibly sick birds. Biofilm research shows that organisms like Salmonella embedded in a protective matrix can survive heat and detergent contact, mechanical scrubbing plus a dedicated disinfecting step is the combination that reliably breaks through. A study titled 'Commonly Used Disinfectants Fail To Eradicate Salmonella enterica Biofilms from Food Contact Surface Materials' (Applied and Environmental Microbiology) found that Salmonella in biofilms on food‑contact materials can survive many standard disinfectants, indicating mechanical scrubbing plus appropriate contact‑time disinfectant is needed to reliably remove them Commonly Used Disinfectants Fail To Eradicate Salmonella enterica Biofilms from Food Contact Surface Materials — Applied and Environmental Microbiology. Here are the alternatives that work.
- Bleach soak: 1 part household bleach (5–8% sodium hypochlorite) to 9 parts water; soak for 10 minutes after mechanical washing; rinse thoroughly under running water and air-dry completely before refilling. This is the method recommended by Cornell Lab and Project FeederWatch
- White vinegar soak: Undiluted or 1:1 with water; effective against mold and light bacterial contamination; less effective against harder pathogens like Salmonella or Mycoplasma than bleach; good for routine maintenance cleaning when disease risk is not elevated
- Boiling water: Effective for metal and ceramic parts; pour boiling water over or submerge parts briefly (30–60 seconds); do not use for plastic — it will warp
- Hot-water and soap hand-wash: Use the hottest water you can tolerate, a stiff brush, and standard dish soap; this is the baseline for any feeder regardless of whether it then goes in the dishwasher or gets a bleach soak
How to do a bleach or vinegar soak correctly
Mix the bleach solution fresh each time, diluted bleach loses effectiveness within a few hours. Use 1 part standard household bleach to 9 parts water (roughly 1 tablespoon bleach per cup of water, or about half a cup per gallon). Submerge the fully disassembled, pre-washed feeder parts completely. Set a timer for 10 minutes. Do not go longer: extended bleach contact can damage rubber and some plastics. After soaking, rinse every part under running water for at least 1–2 minutes until there is no bleach smell detectable. Then air-dry completely. Wear gloves and work in a ventilated space. Do not mix bleach with vinegar, the combination produces chlorine gas.
For a vinegar soak, use undiluted white vinegar in a tub or bucket; soak for 30–60 minutes for mold removal. Rinse thoroughly afterward because vinegar residue is mildly acidic and can influence food palatability (birds are sensitive to sour-smelling feeders). Vinegar is a reasonable routine-maintenance alternative for people who prefer to avoid bleach, but understand its limitations: it is not adequate disinfection during a known disease event.
Drying, reassembly, and pre-refill inspection
Skipping the drying step is probably the most common mistake I see. A feeder put back together damp will develop mold faster than one that was never washed. Allow all parts to air-dry on a clean towel for a minimum of 2 hours after washing; in humid weather or if parts are thick-walled plastic, overnight is better. You can speed drying by patting parts with a clean lint-free cloth before air-drying, but do not use paper towels on feeding ports as fibers clog them.
Before reassembly, run through this quick checklist.
- Inspect each part visually: look for cracks in the tube or hopper body, cloudiness in clear acrylic, rust spots on metal, and chips in any coating
- Check all rubber and silicone gaskets: they should be flexible, not brittle; replace any that have cracks or feel stiff
- Hold tube or hopper parts up to light: hairline cracks indicate the part should be replaced
- Test any moving parts (seed flow adjusters, caps, swing-open cage doors) to make sure they still operate freely
- Sniff the feeder: any musty or chemical smell means rinsing was incomplete — rinse again and dry again
- Reassemble in a clean area, not on the ground
- Do a quick 'shake test' after reassembly to confirm all ports are clear and the feeder holds together before hanging
How often should you clean feeders
Cornell Lab's Project FeederWatch recommends cleaning feeders at least every 1–2 weeks. That is a sound baseline, but I treat it as a minimum. Your actual cleaning frequency should be driven by conditions, not just the calendar.
| Feeder type or condition | Minimum cleaning frequency | Increase to when... |
|---|---|---|
| Seed tube feeders (dry climate) | Every 2 weeks | Weekly in summer heat or wet weather |
| Hummingbird/nectar feeders | Every 2–3 days in warm weather (above 70°F) | Daily above 85°F |
| Open tray/platform feeders | Weekly | Every 2–3 days in rain or high traffic |
| Suet cages | Every 2–4 weeks in cool weather | Weekly in warm weather; suet goes rancid faster above 60°F |
| Hopper feeders | Every 2 weeks | Weekly in rain, snow melt, or high humidity |
| Any feeder after a sick bird visit | Immediately | Then every 3–4 days until no further sick birds observed |
| Any feeder during a known regional disease event | Every 3–4 days at minimum | Consider temporarily removing feeders per local wildlife authority advice |
During avian influenza advisories, the CDC recommends cleaning feeders regularly and wearing disposable gloves when handling them. The USDA Wildlife Services adds that congregating birds at feeders raises disease transmission risk generally, and more frequent cleaning is one of the practical management responses within your control. USDA Wildlife Services cautions that congregating wildlife at feeders and baths increases disease transmission and recommends routine cleaning and management to reduce disease spread and secondary wildlife/rodent problems (Don't Feed the Wildlife | USDA Wildlife Services).
Troubleshooting: stains, odors, damaged parts, and when to retire a feeder
Persistent stains and mineral deposits
Hard water deposits and tannin stains from wet seed or nectar are common and do not respond well to standard dishwasher cycles alone. Soak affected parts in undiluted white vinegar for 30–60 minutes; the acid dissolves calcium and magnesium deposits effectively. For brown tannin staining on plastic, a paste of baking soda and a few drops of water, applied with a soft cloth and left for 10 minutes, often shifts the stain without abrasion that would scratch the surface.
Persistent odors after washing
If a feeder smells musty or sour after washing and drying, the biofilm has not been fully removed. This happens most often in seed ports, nectar channels, and tight feeder joints that the dishwasher spray arms could not reach. Disassemble completely, scrub with a bottle brush and hot soapy water, do a 10-minute bleach soak, rinse thoroughly, and dry fully. If the smell persists after two complete cycles through this process, the plastic has absorbed the odor or mold has penetrated micro-cracks. At that point, replace the part or the whole feeder.
Replacement parts and when to retire a feeder
Most major feeder brands sell replacement parts: port assemblies, caps, perch bars, and gaskets. Before retiring a feeder that is otherwise structurally sound, check the manufacturer's website or contact them; a $3 port assembly can extend a feeder's useful life by years. Retire a feeder when it has structural cracks that cannot be cleaned (biofilm shelters in cracks), when corrosion has spread to food-contact surfaces, when gaskets can no longer be replaced, or when the feeder has been involved in a significant disease event and you have reason to think it cannot be adequately disinfected. Think of feeders the same way you would a cutting board: once it is deeply scored and the material cannot be sanitized, it needs to go.
Balancing bird safety, feeder longevity, and practical maintenance
The dishwasher is a legitimate, time-saving tool for feeder maintenance when used correctly. The evidence from Cornell Lab, NSF sanitization standards, and recent disease-transmission research all supports regular, hot cleaning as an effective way to reduce pathogen risk at feeders. The key is knowing which feeders and parts it works for, preparing them properly, and not treating the dishwasher as a substitute for mechanical scrubbing or for genuine disinfection when disease risk is elevated.
Whatever cleaning method you use, the habit of regular cleaning matters more than the method. A feeder washed by hand every two weeks is dramatically safer for birds than a dishwasher-safe feeder cleaned once a season. And if you are experimenting with different foods, oats, dried mealworms, peanuts, peanut butter, or coconut oil as part of your feeding setup, the residue from each of those creates slightly different cleaning challenges that are worth factoring into how often and how thoroughly you clean. Matching your cleaning routine to your feeding habits is the practical core of good feeder maintenance.
FAQ
Can you clean bird feeders in a household dishwasher safely?
Sometimes — many feeder parts made of glass, hard plastic (labelled dishwasher‑safe), and some stainless steel components can go on the top rack of a dishwasher. However, many feeder materials (wood, painted/coated metal, thin plastics, rubber/silicone seals, fabrics, glued parts) and some commercial feeder models are NOT dishwasher‑safe because heat, alkaline detergent, and spray action can warp, crack, remove coatings, degrade seals, or cause rust. Use the dishwasher only when the manufacturer explicitly says a part is dishwasher‑safe and inspect parts before and after.
Which feeder materials and parts are usually dishwasher‑safe vs not?
Usually dishwasher‑safe: tempered glass jars, thick hard plastics explicitly marked dishwasher‑safe (top rack), solid stainless‑steel parts, and unpainted metal trays that are stainless. Not dishwasher‑safe (avoid): wood, bamboo, painted/coated metals, thin or flexible plastics that can warp, non‑stainless metals prone to rust, rubber or silicone gaskets (may degrade), glued assemblies, perches with glued finishes, and decorative painted parts. When in doubt, handwash.
How should I prepare and disassemble feeders before using the dishwasher?
1) Fully disassemble: remove lids, perches, bases, ports, seals, and any small parts. 2) Empty and brush out loose seed/debris. 3) Remove sticky or oily residues (peanut butter, coconut oil) by hand-scraping and a pre-rinse with hot water and dish soap—do not rely on the dishwasher to remove thick grease. 4) Place small parts in a secure basket or mesh bag and put delicate items on the top rack. 5) Keep metal parts that may rust away from direct heating elements and avoid mixing with corrosive items (cast iron).
What dishwasher settings and detergents work best if I do use the dishwasher?
Use a full‑temperature wash and, if available, the Sanitize/SaniRinse cycle (raises final rinse temperature). Use automatic dishwasher detergent (the usual powdered/pack or tablet) for organic soil removal. Avoid detergent boosters with heavy alkalinity if you know parts are sensitive. Run the hottest available cycle, and use heated dry only for dishwasher‑safe items — but recognize that high heat may accelerate wear on plastics and seals. A final hot rinse/sanitize is useful for pathogen reduction but is not a substitute for mechanical scrubbing on heavily soiled or biofilm‑covered parts.
Does running feeders through the dishwasher disinfect them and remove pathogens?
A high‑temperature sanitize cycle can substantially reduce bacteria (and many viruses) on clean, exposed surfaces when soil is minimal. However, thermal sanitization is less effective when organic soil or biofilms remain. Dishwashers do not reliably remove biofilms or heavy greasy residues; scrubbing and pre‑soak or a chemical disinfectant (bleach or approved sanitizer) are needed after cleaning for full disinfection. Treat dishwasher cleaning as a cleaning step and, when disease risk is a concern, follow with appropriate disinfection.
Which feeder styles are commonly safe to clean in a dishwasher, and which are not?
Commonly OK on top rack (if labelled): glass hummingbird nectar jars and simple plastic hummingbird ports/bases, some solid plastic tray liners, and thick plastic or stainless components from tube feeders. Not recommended: complete tube feeders with glued perches or thin plastic tubes from premium brands (many manufacturers advise handwash), wooden hopper feeders, suet cages with wooden frames, vintage/painted feeders, and anything with rubber gaskets that could degrade.
Next Article
Can You Put Peanuts in a Bird Feeder Safely?
Learn if you can put peanuts in a bird feeder, which types are safe, how to prevent waste, and better alternatives.